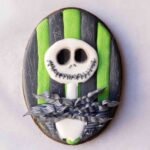
Jack Skellington Cookie
Create your own Jack Skellington cookie with this step by step tutorial. It walks you through each step to create Jack Skellington's face.
Equipment
- chocolate sugar cookie see Tools For The Job section
- Royal icing see Tools For The Job section
- large cookie cutter
- scribe or toothpick
- Wilton or Ateco piping tip 104
- disposable tipless piping bags
- fine thin brush
- flat brush
- round brush
- white edible art paint
- parchment paper
- paper towels
- paint palette
Instructions
Creating Jack's Bow Tie
- Use the stiff black royal icing with the 104 piping tip. Pipe a dollop of royal icing onto parchment paper - this is where we will anchor the bow tie.
- With the piping tip at the edge of the dollop, and the larger opening of the tip pointing down, squeeze and pull the piping tip away but also creating some wiggling movements. Stop squeezing and gently pull the bag away and you should be left with a ruffled line. Repeat 3x on one side, and then 3x on the other side.
- Place the bow ties somewhere where they can dry. Hot Tip: I like to create extra to have in case some break.
OUTLINING AND FLOODING COOKIE BASE
- Outline the cookie base with the stiff black icing. Divide the inner part of the cookie into even columns with the black icing.
- Flood each column with the flood icing, alternating between the black and neon green. Use your scribe or toothpick as needed. Allow to completely dry before proceeding to next step.
- Once the royal icing is completely dry you can etch an outline of Jack into the royal icing. You can also etch fun Nightmare Before Christmas inspired designs into the icing (optional).
- Place a bit of black flood icing where Jack's eyes will be and smooth flat using the flat bristle brush. Allow to dry.
CREATING JACK SKELLINGTON PORTRAIT
- Use the stiff white royal icing to create the outline of Jack's eyes, face, neck and shirt.
- Use flood white royal icing to fill in Jack's face only. We will flood the shirt and neck later.
- Use stiff black royal icing to outline the top of Jack's suit, and the flood with flood black royal icing but not to the edge of the cookie.
- Use the flat bristle brush to 'flatten' out the icing towards the edge of the cookie. This helps create a textured fade away. Allow to dry before proceeding to next step.
- Prepare your edible white paint in the paint palette, and thin brush for details. Dampen brush with white edible paint and gently begin creating lines on Jack's suit.
- Create the lines on both sides with the edible white paint, and then allow to dry.
- Repeat the same white lines painting with the bow ties. Paint on both sides of the bow ties since we are going for a 3D effect.
- Flood the neck and shirt area with the flood white royal icing. Have bow tie ready because we will place on top after flooding.
- Place bow tie in the middle and press in gently - don't press firmly because you do not want the freshly flooded royal icing to spread and go where we don't want it to go.
- Use the stiff black royal icing to create Jack's nose and mouth. Make sure to anchor each stitch on his mouth from one side of the cookie before pulling over to the next.
- Optional: If you want to create depth in his eyes then use the black edible powder and round bristle brush to gently shade along the inside of his eyes.
Notes
Knowledge and Experience with Royal Icing Recommended. If you are a beginner and have never used royal icing than I don't recommend this tutorial. An understanding and hands on experience of royal icing is extremely helpful to understand the requirements of what needs to be done to create this cookie.
Bake the chocolate sugar cookies recipe, and prepare all your royal icing the day prior. I recommend preparing this the day prior to allow the colors in your icing to develop (deepen).
Difficulty With Piping. You want to make sure with the piping tip 104 that you have that royal icing dollop to anchor the piped icing to because it makes it much easier to work with. Also, I found the Wilton's tip 104 works well, but the larger opening is a bit TOO large for the bow tie. Ateco 104 piping tip is more narrow and worked much better in my opinion. If you only have the Wilton's you can use some pliers to pinch in that larger portion to make it a bit more narrow.
