


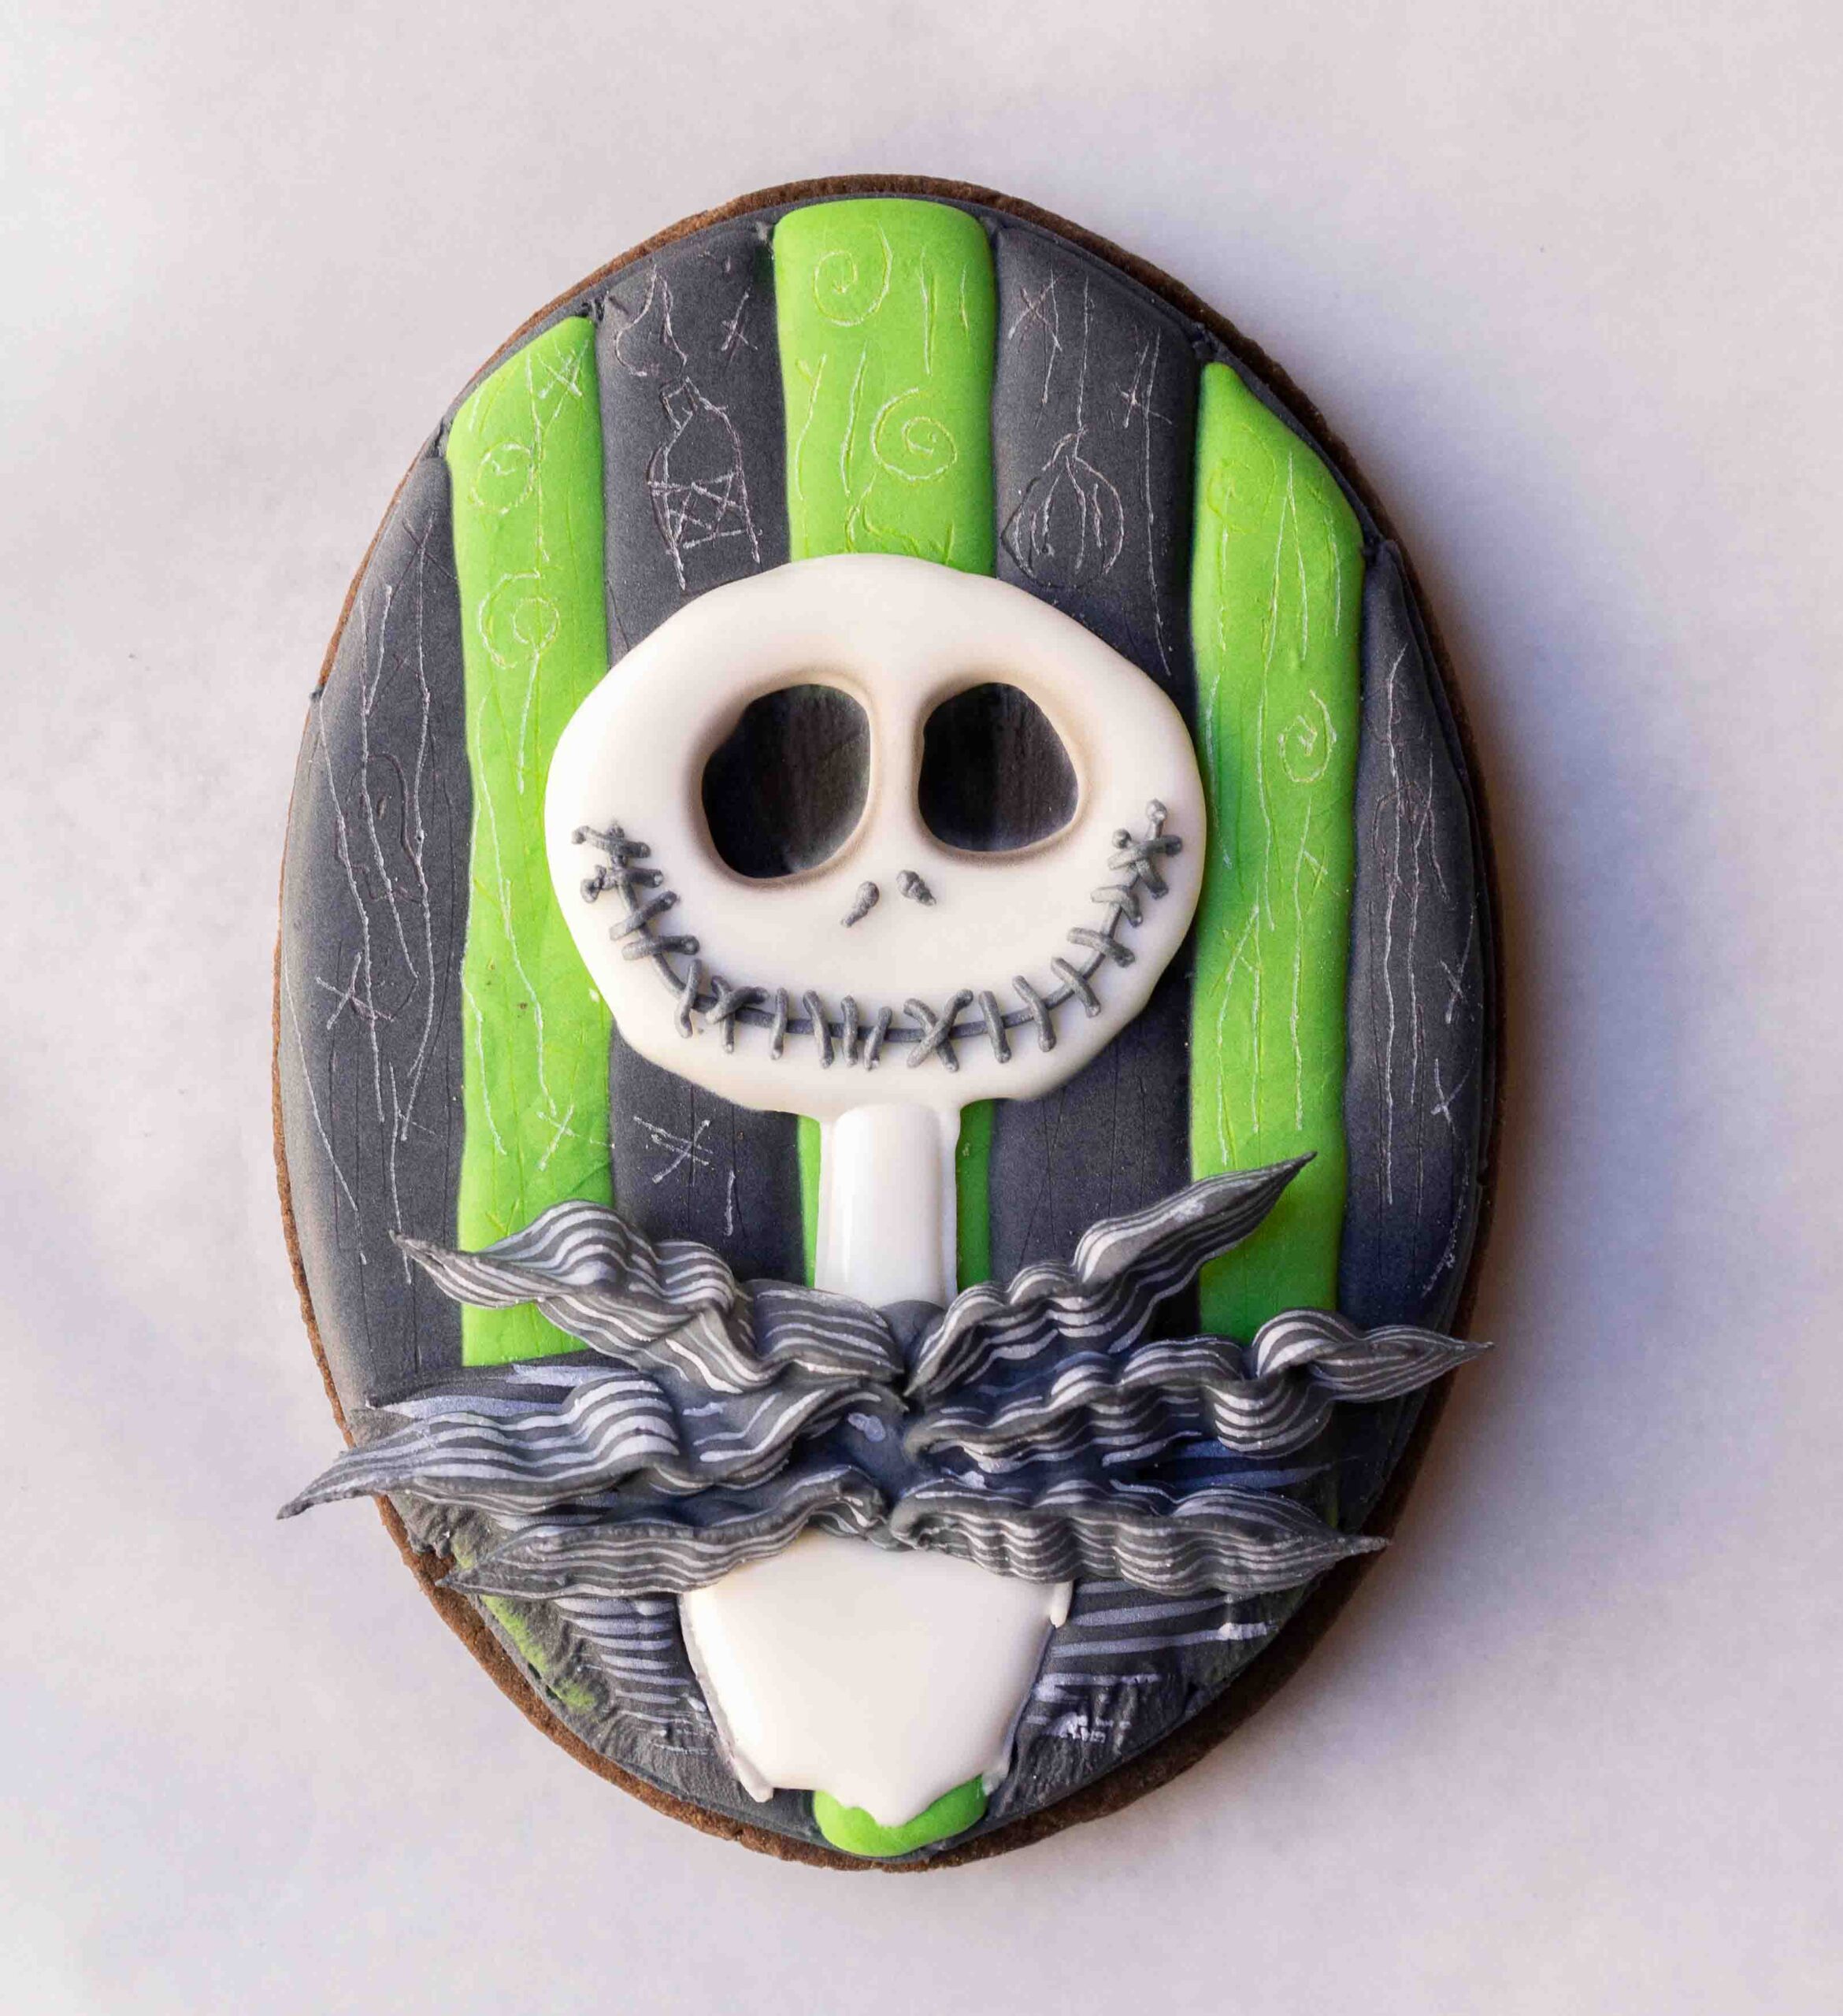
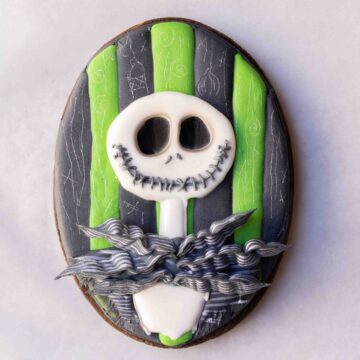
Create your own Jack Skellington cookie with this step by step tutorial. It walks you through each step to create Jack Skellington's face. This tutorial does require some knowledge and experience using royal icing.
Save This Recipe for Later!
We are finally here my friends! I am SO EXCITED to share this Halloween tutorial with you! This Jack Skellington portrait was first inspired by Silly Sculptures in 2022, and I absolutely loved the thought of making Jack his own portrait cookie. The though of having a Jack Skellington face cookie gives me so much joy - plus he is edible!! If you head over to my Instagram page you can check out the other Nightmare Before Christmas characters I made into cookies.
My creative soul finds the most pleasure in creating what I can to share with others - whether as a gift or the knowledge of how to do it. I truly hope you find this nightmare before Christmas cookie tutorial helpful!
Jump to:
Why You Will Love This Tutorial
Get Creative! This tutorial helps guide you how to recreate your own Jack Skellington cookie, but the beauty of creating is also adding your own creative spin! Have fun and get creative with it!
Share The Fun! You can have some fun with these Jack Skellington face cookies and share with friends or family, or even host a decorating party to recreate them! I mean, why not, right??
If you are a seasoned cookie decorator, or just want to have some fun during the holidays, then I also recommend trying these other cut out recipes! Apple Cider, Maple and Pecans Sugar cookies, Blueberry Lemon sugar cookies, and my Vanilla Bean Sugar Cookies! Happy baking and decorating!
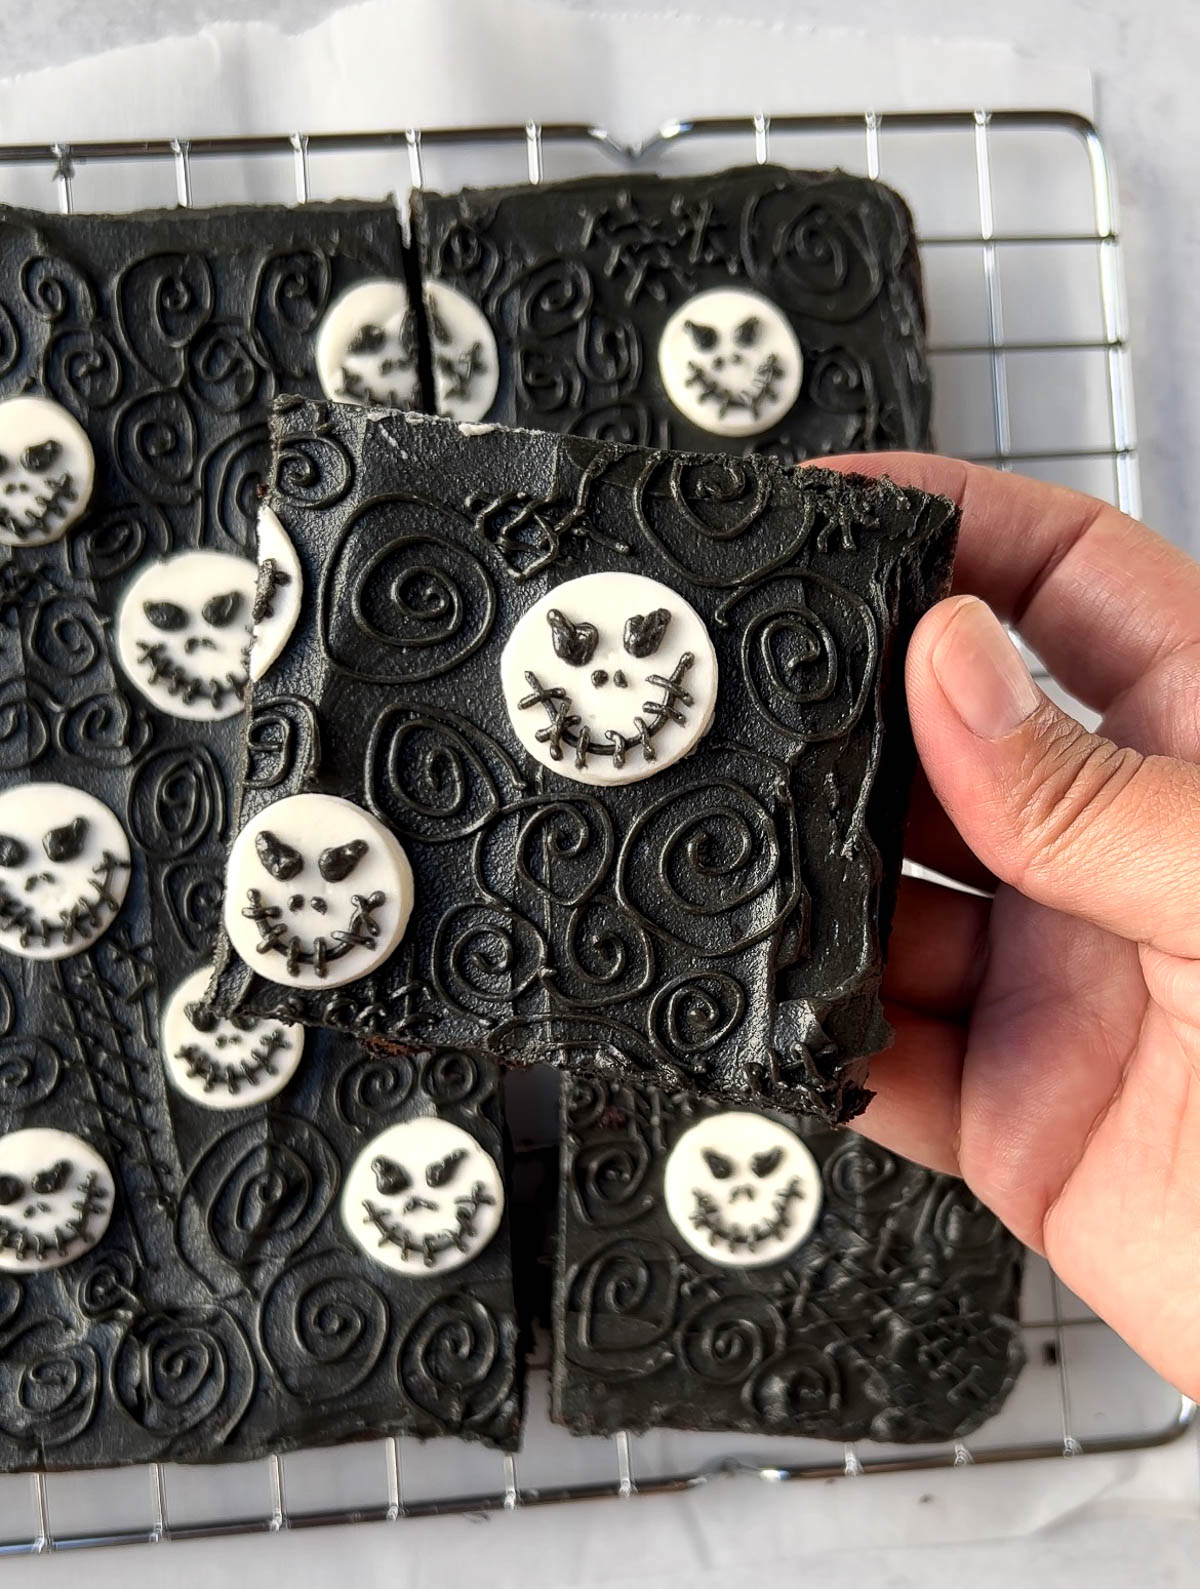
If royal icing is not for you, don't worry! I also have some Jack Skellington cookie bars that you can create! These use chocolate buttercream and also walk you through each step to create some fun Jack cookie bars.
Tools For The Job
The tutorial is created to share how to recreate this dessert in your own home to share with family and friends. This is not intended to be used for resale purposes.
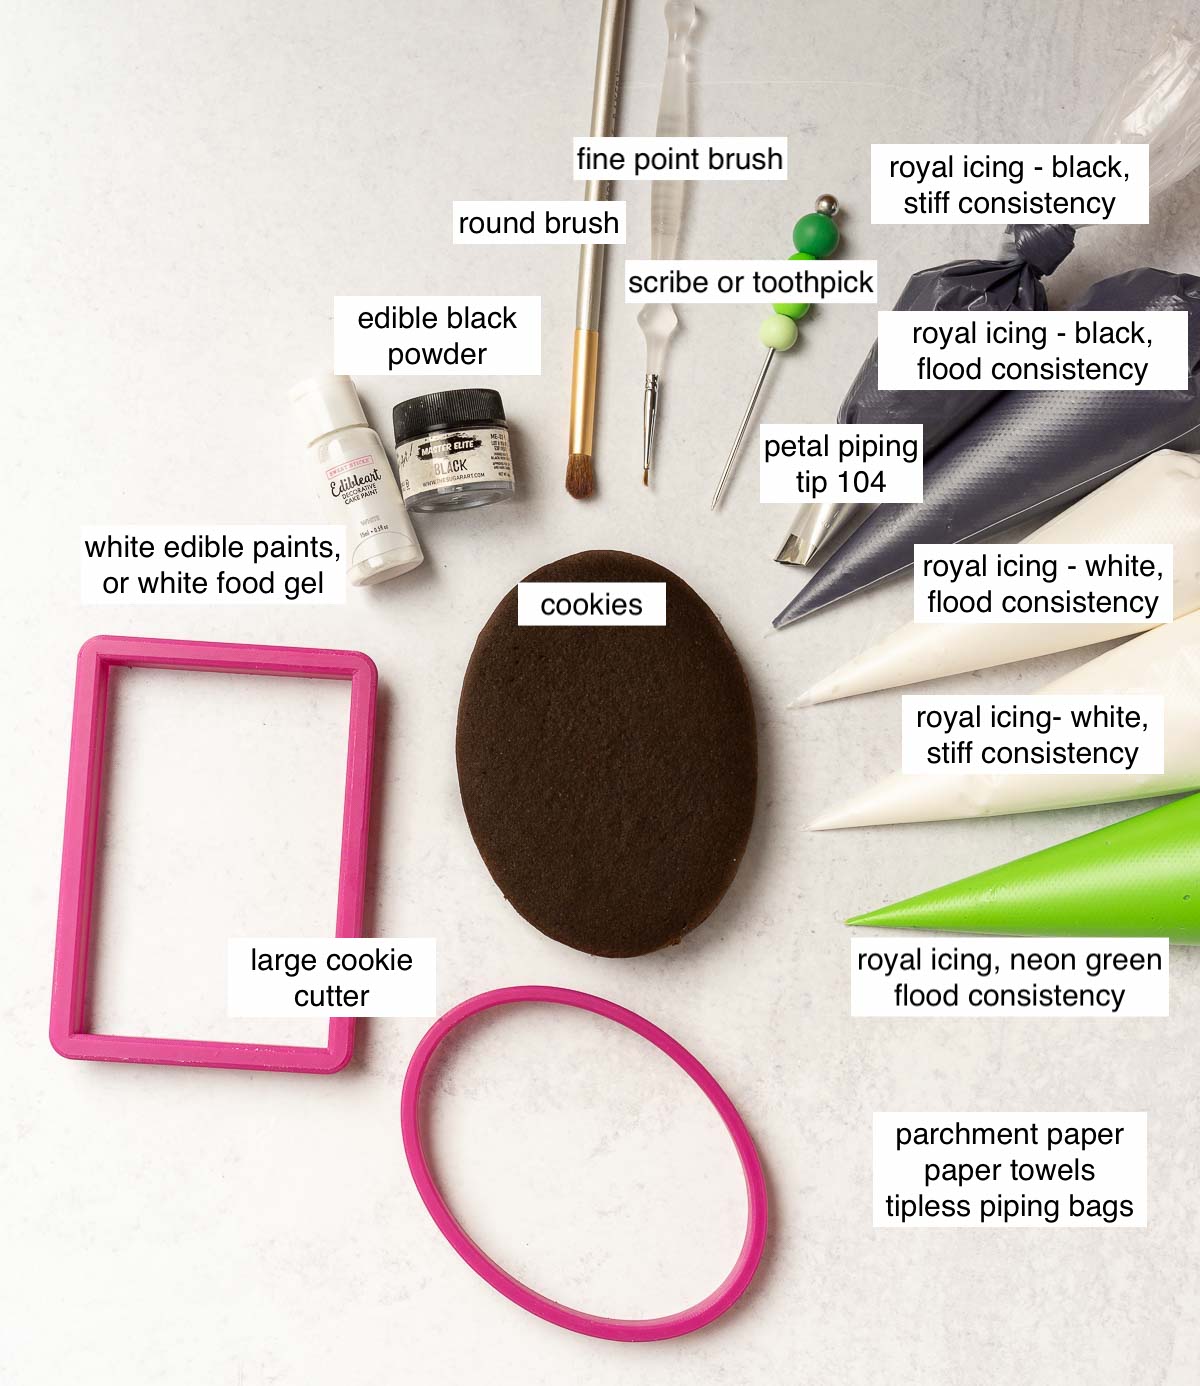
You Will Need:
- Chocolate Sugar Cookie recipe, or your own preferred recipe
- Royal Icing Recipe
- Black - stiff consistency
- Black - flood consistency x2
- 1 bag fitted with piping tip (Wiltons 104 or Ateco 104)
- 1 bag for detailed piping
- White - stiff consistency
- White - flood consistency
- Neon green - flood consistency
- large cookie cutter
- scribe or toothpick
- petal piping tip - Wilton's 104 or Ateco 104 (Ateco preferred because it has thinner opening)
- fine point brush (for detailed painting)
- round bristle brush (for shading)
- flat bristle brush (for spreading icing)
- white edible art paint, or white food gel coloring*
- edible black powder, optional (for shading)
- parchment paper
- paper towels
- tipless piping bags
- paint palette
*if using white food gel coloring you will need to mix with either vodka or an extract (I like using almond extract).
Tips For Success
Knowledge and Experience with Royal Icing Recommended. If you are a beginner and have never used royal icing than I don't recommend this tutorial. An understanding and hands on experience of royal icing is extremely helpful to understand the requirements of what needs to be done to create this cookie.
Prepare tools and ingredients in advance. Having all the items ready to go and at your side helps the process to be much more seamless and enjoyable. Definitely color your black royal icing the day before to allow the black color to develop.
Give Yourself Time. Good work requires time and patience, so give yourself the time needed to make the best cookies you possibly can. These cookies overall can be completed within 1 day.
Have Fun! The whole purpose of this tutorial is to create Jack so you can enjoy the process, and share with family and friends.
Let's Make Jack Skellington Cookies
This Jack Skellington cookie tutorial is created so you can recreate and share with family and friends. This is not intended to be used for resale purposes. Also, note I typically use 2 or 3 cookies with the same design as I work through it, so you may see some variations between the photos due to this.
Bake the chocolate sugar cookies recipe, and prepare all your royal icing the day prior. I recommend preparing this the day prior to allow the colors in your icing to develop (deepen).
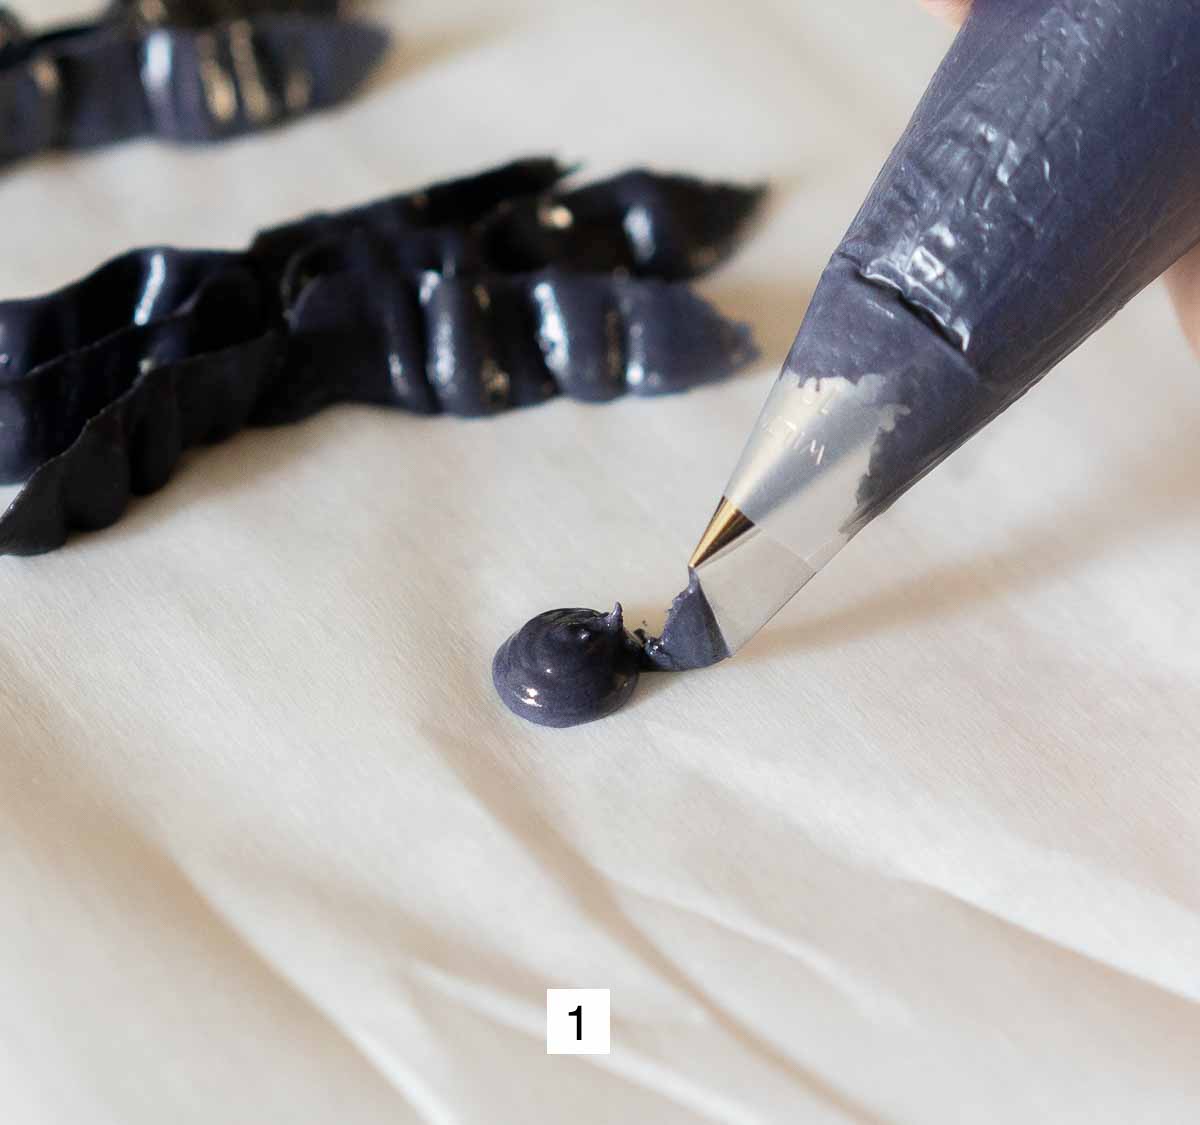
Creating Jack's Bow Tie
Step 1: Use the stiff black royal icing with the 104 piping tip. Pipe a dollop of royal icing onto parchment paper - this is where we will anchor the bow tie.
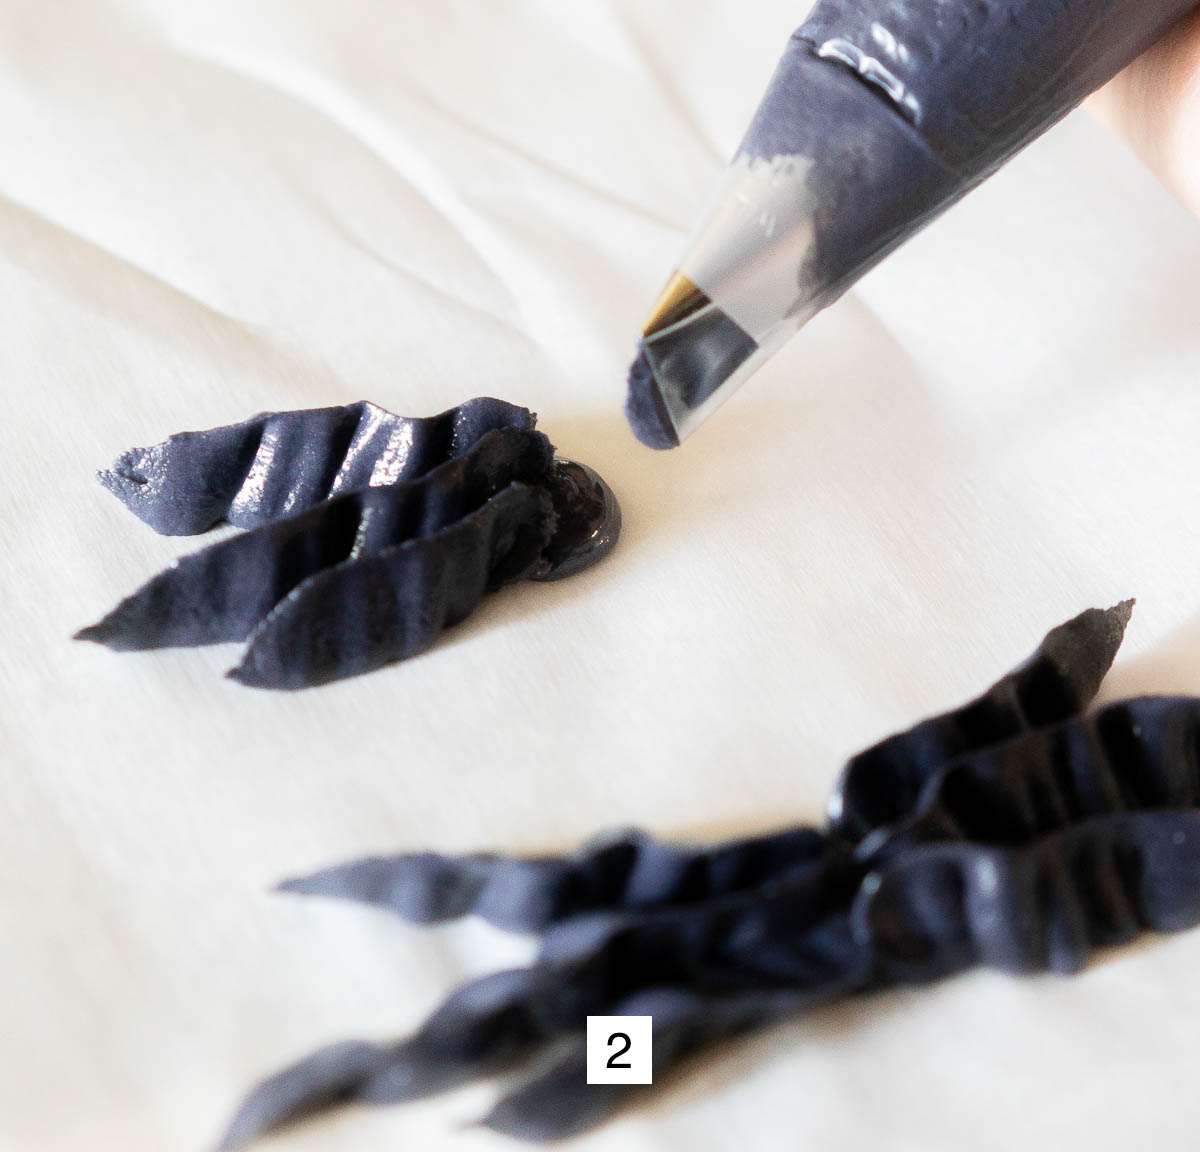
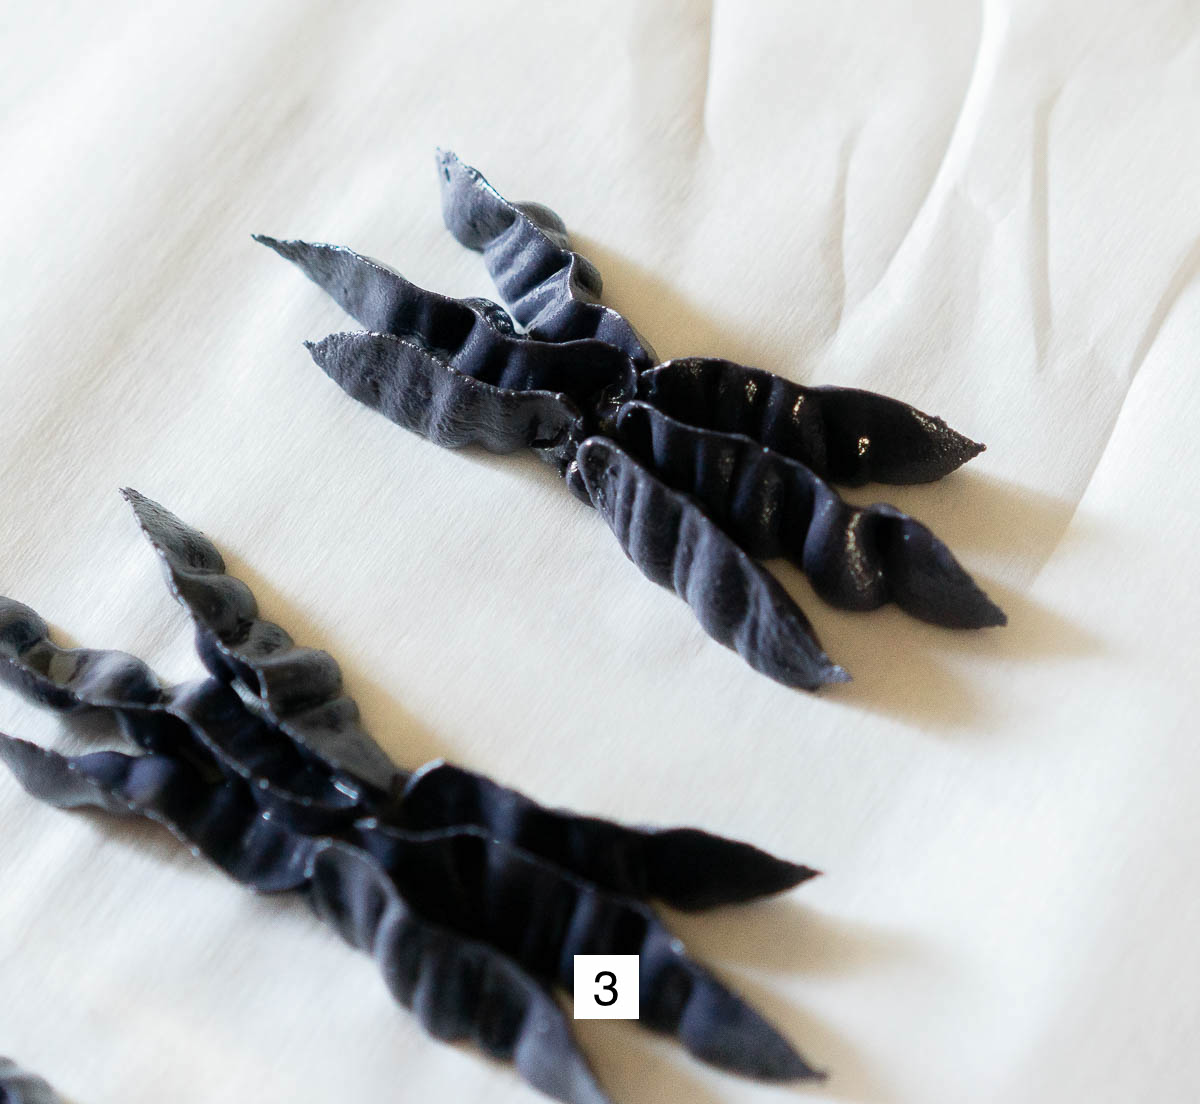
Step 2: With the piping tip at the edge of the dollop, and the larger opening of the tip pointing down, squeeze and pull the piping tip away but also creating some wiggling movements. Stop squeezing and gently pull the bag away and you should be left with a ruffled line. Repeat 3x on one side, and then 3x on the other side.
Step 3: Place the bow ties somewhere where they can dry. Hot Tip: I like to create extra to have in case some break.
Outlining and Flooding Cookie Base
Step 4: Outline the cookie base with the stiff black icing. Divide the inner part of the cookie into even columns with the black icing.
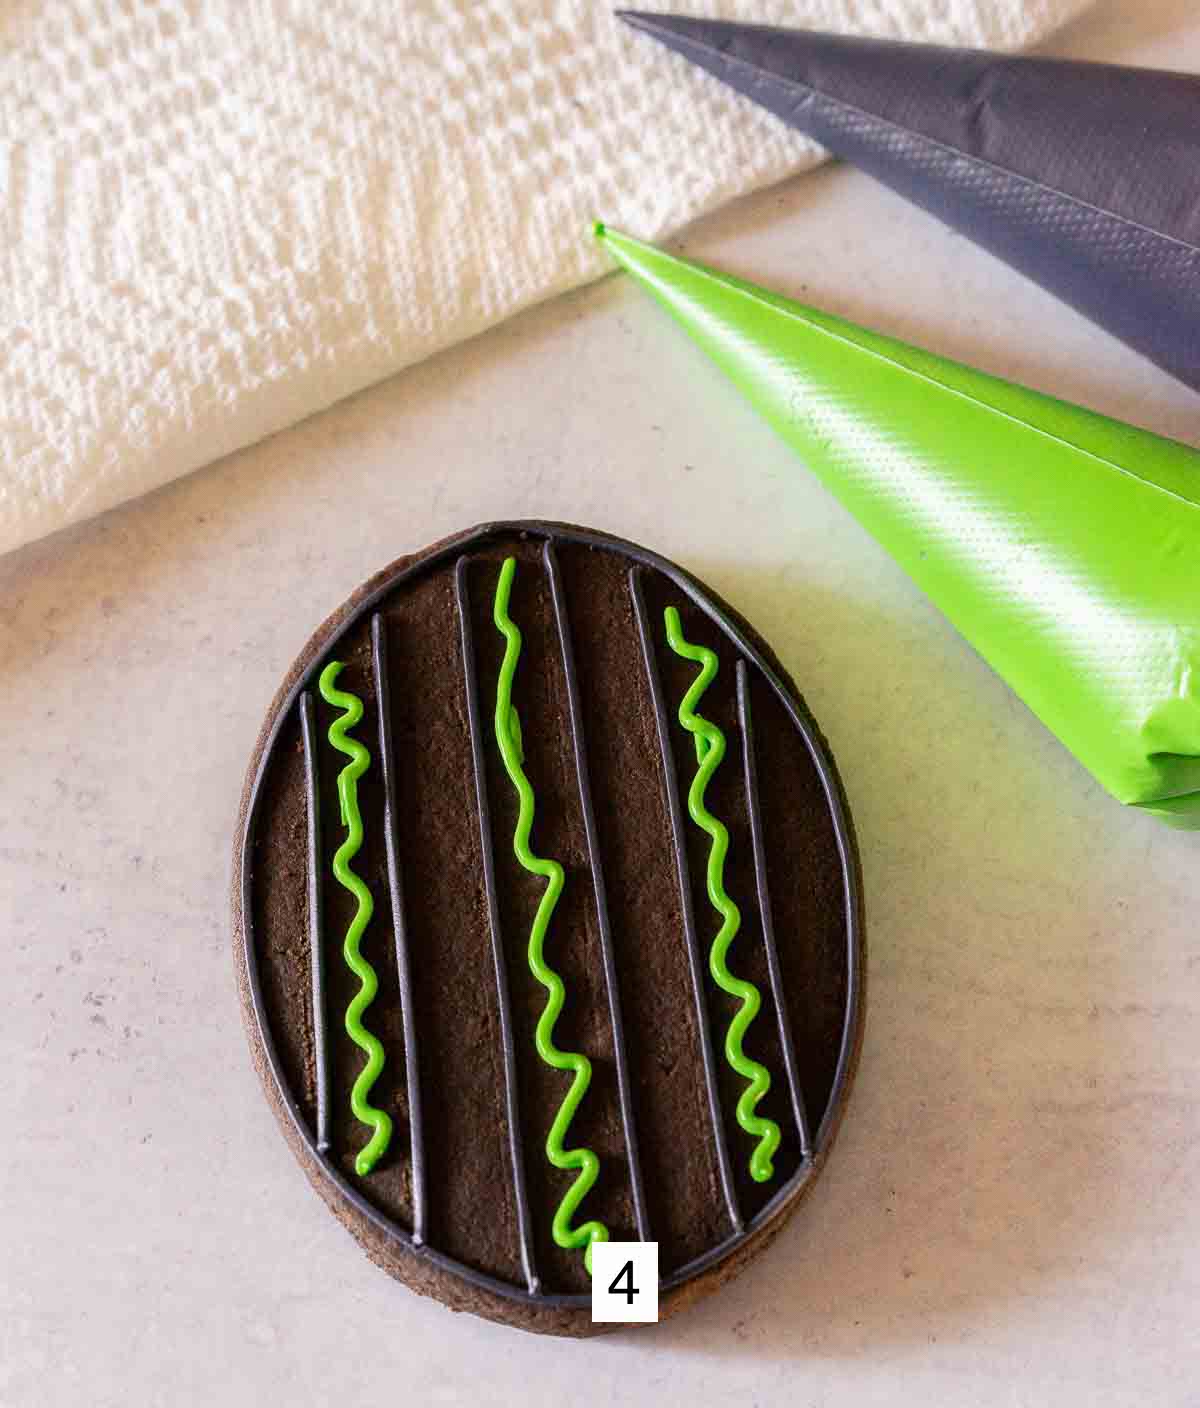
Step 5: Flood each column with the flood icing, alternating between the black and neon green. Use your scribe or toothpick as needed. Allow to completely dry before proceeding to next step.
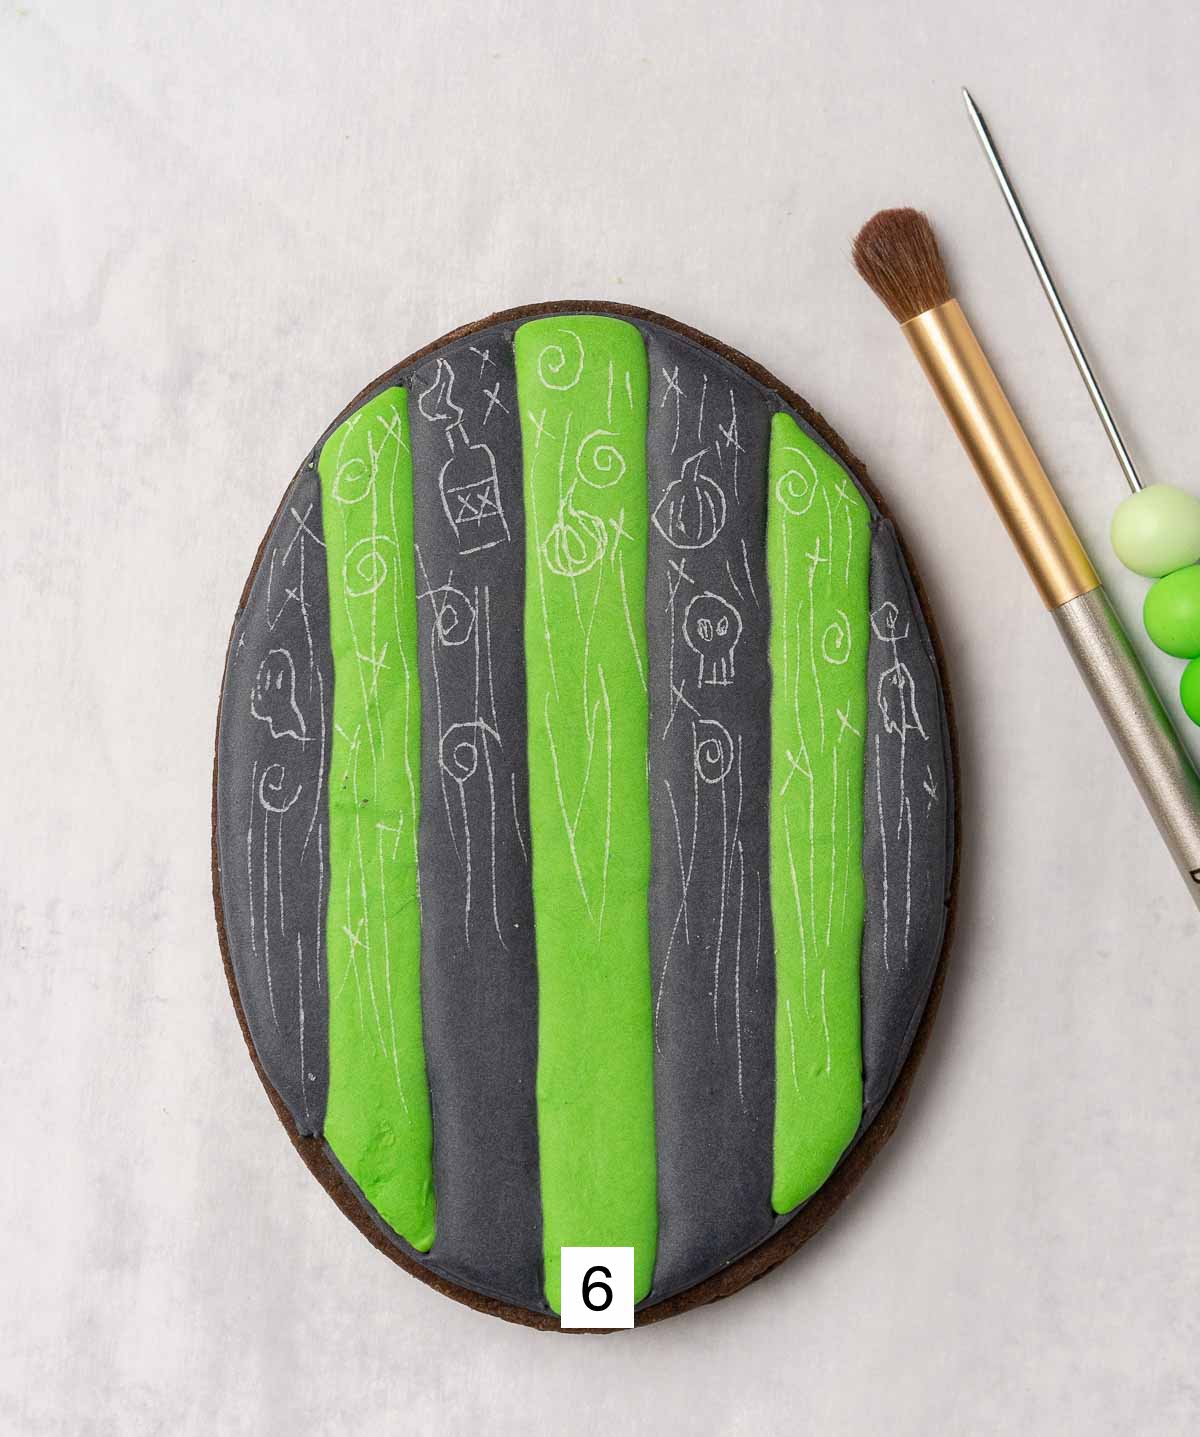
Step 6: Once the royal icing is completely dry you can etch an outline of Jack into the royal icing. You can also etch fun Nightmare Before Christmas inspired designs into the icing (optional).
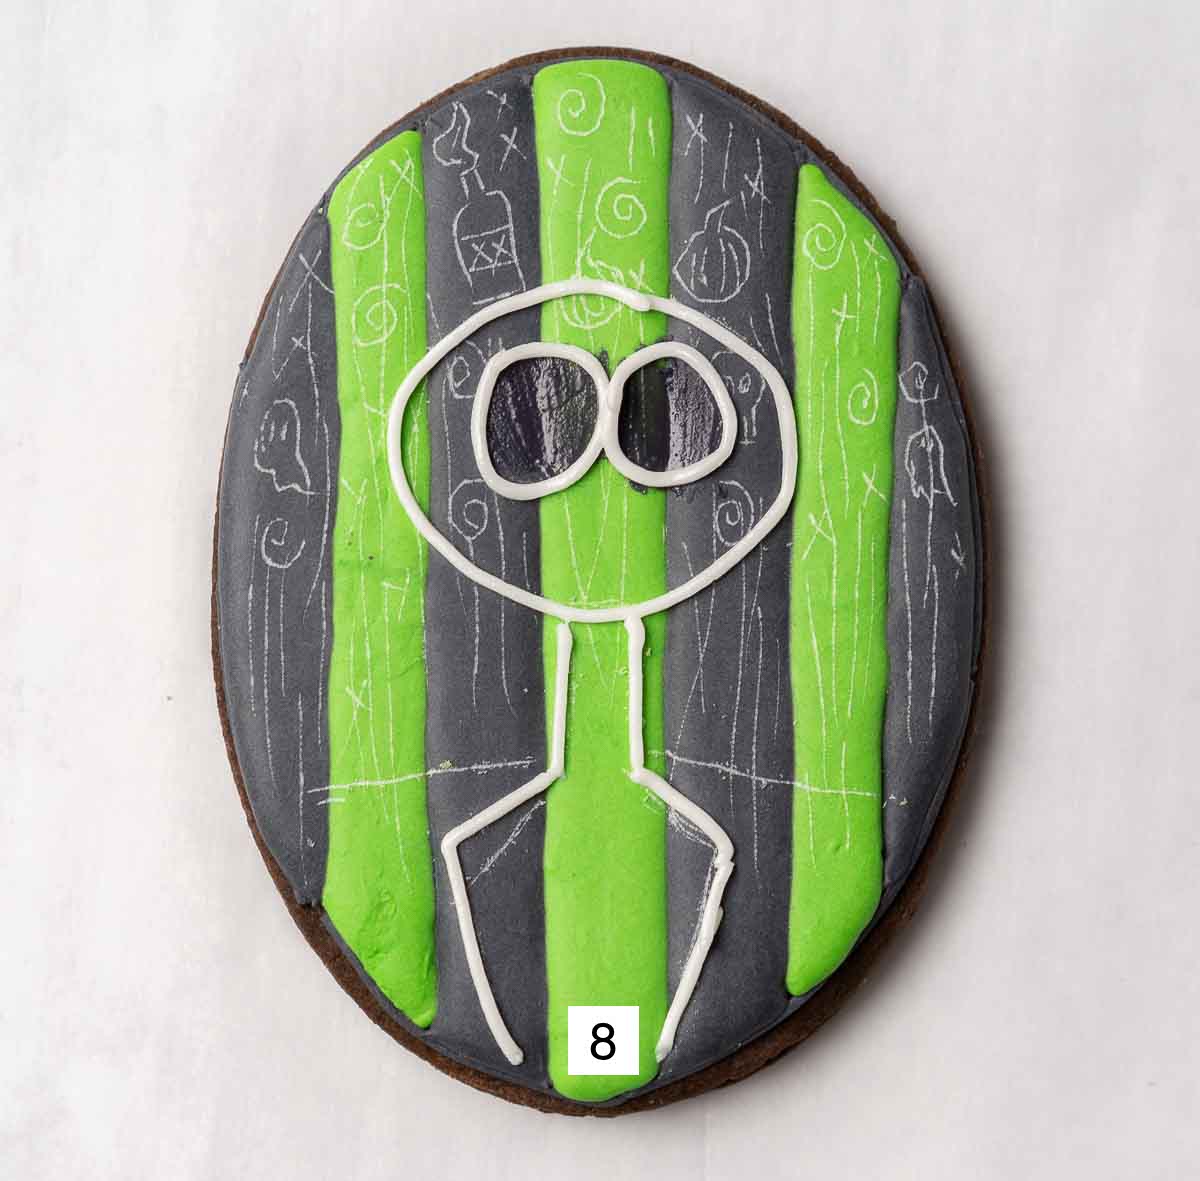
Step 7: Place a bit of black flood icing where Jack's eyes will be and smooth flat using the flat bristle brush. Allow to dry.

Creating Jack Skellington Portrait
Step 8: Use the stiff white royal icing to create the outline of Jack's eyes, face, neck and shirt.
Step 9: Use flood white royal icing to fill in Jack's face only. We will flood the shirt and neck later.
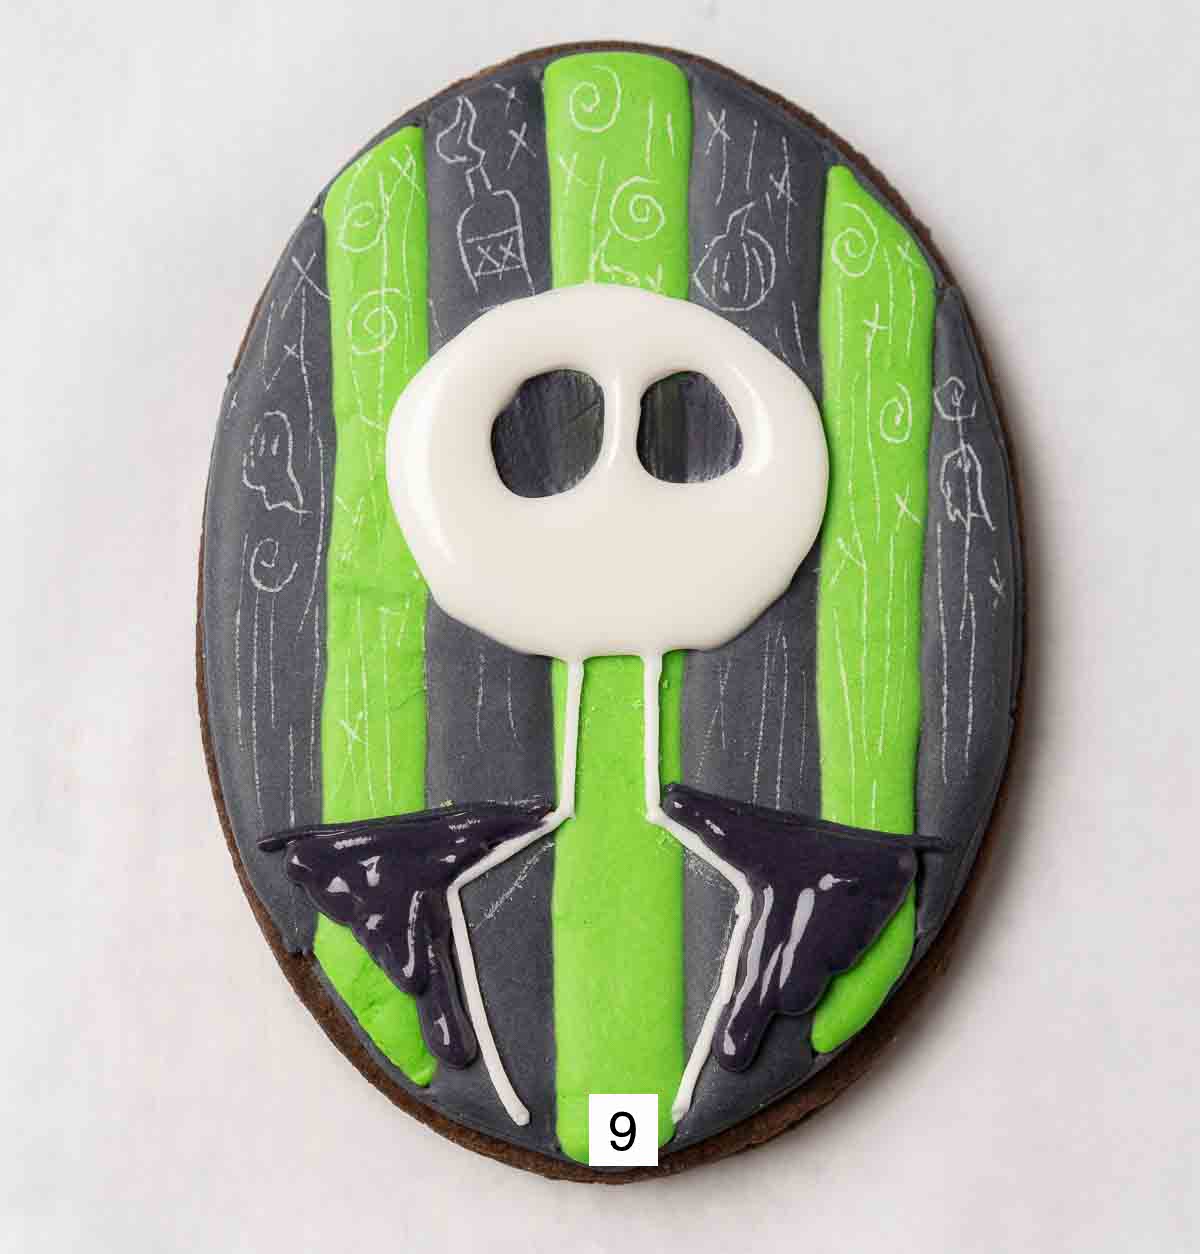
Step 10: Use stiff black royal icing to outline the top of Jack's suit, and the flood with flood black royal icing but not to the edge of the cookie. (shown above)
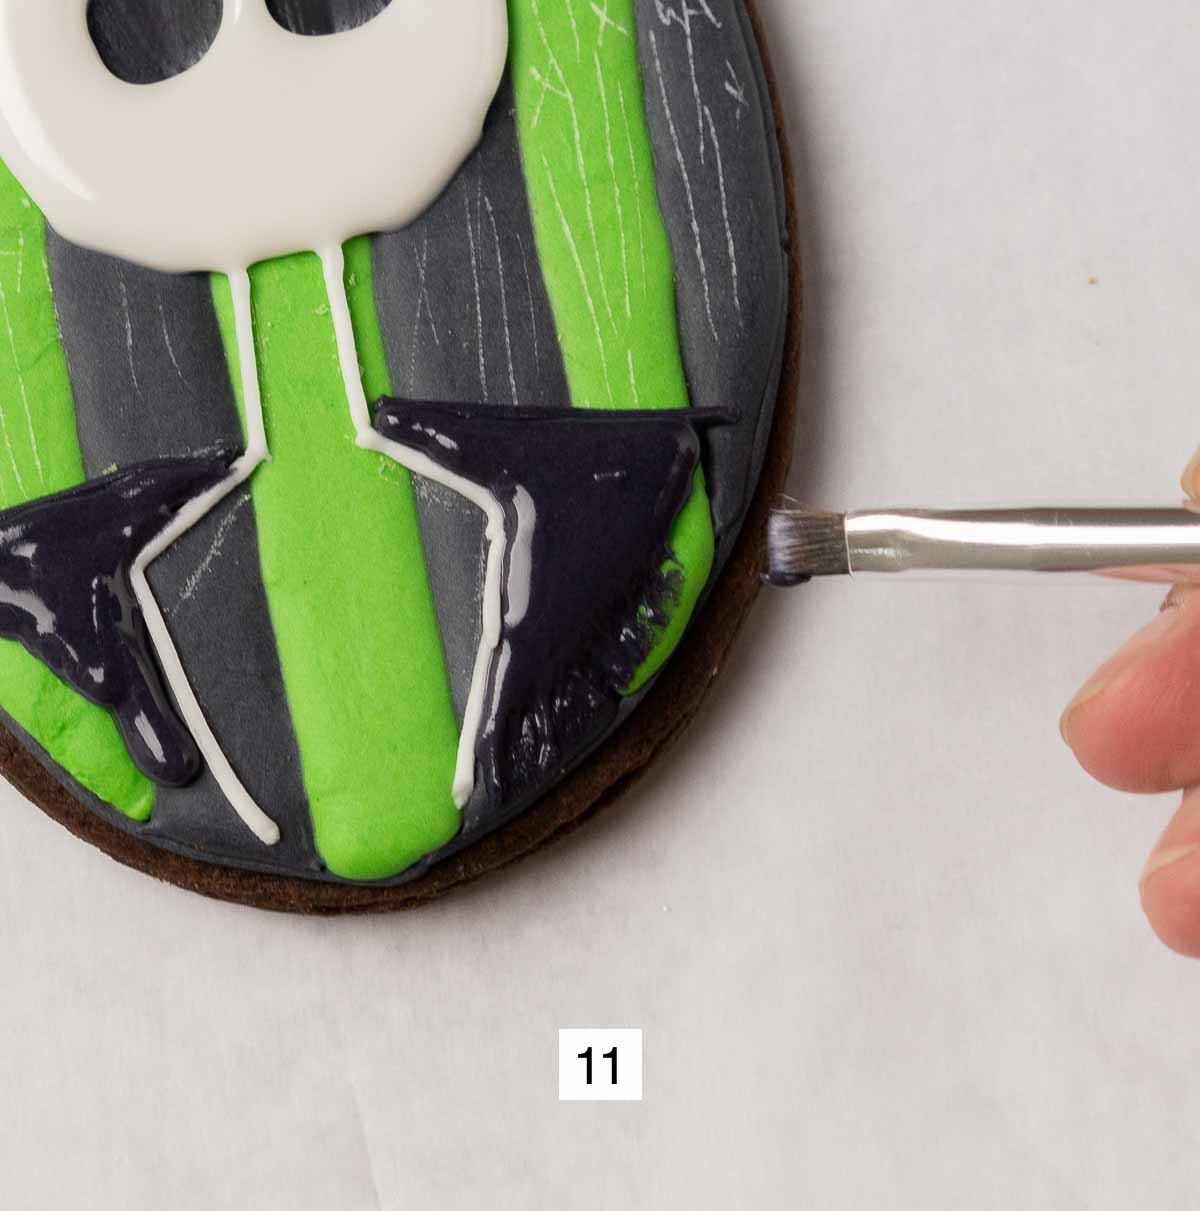
Step 11: Use the flat bristle brush to 'flatten' out the icing towards the edge of the cookie. This helps create a textured fade away. Allow to dry before proceeding to next step.
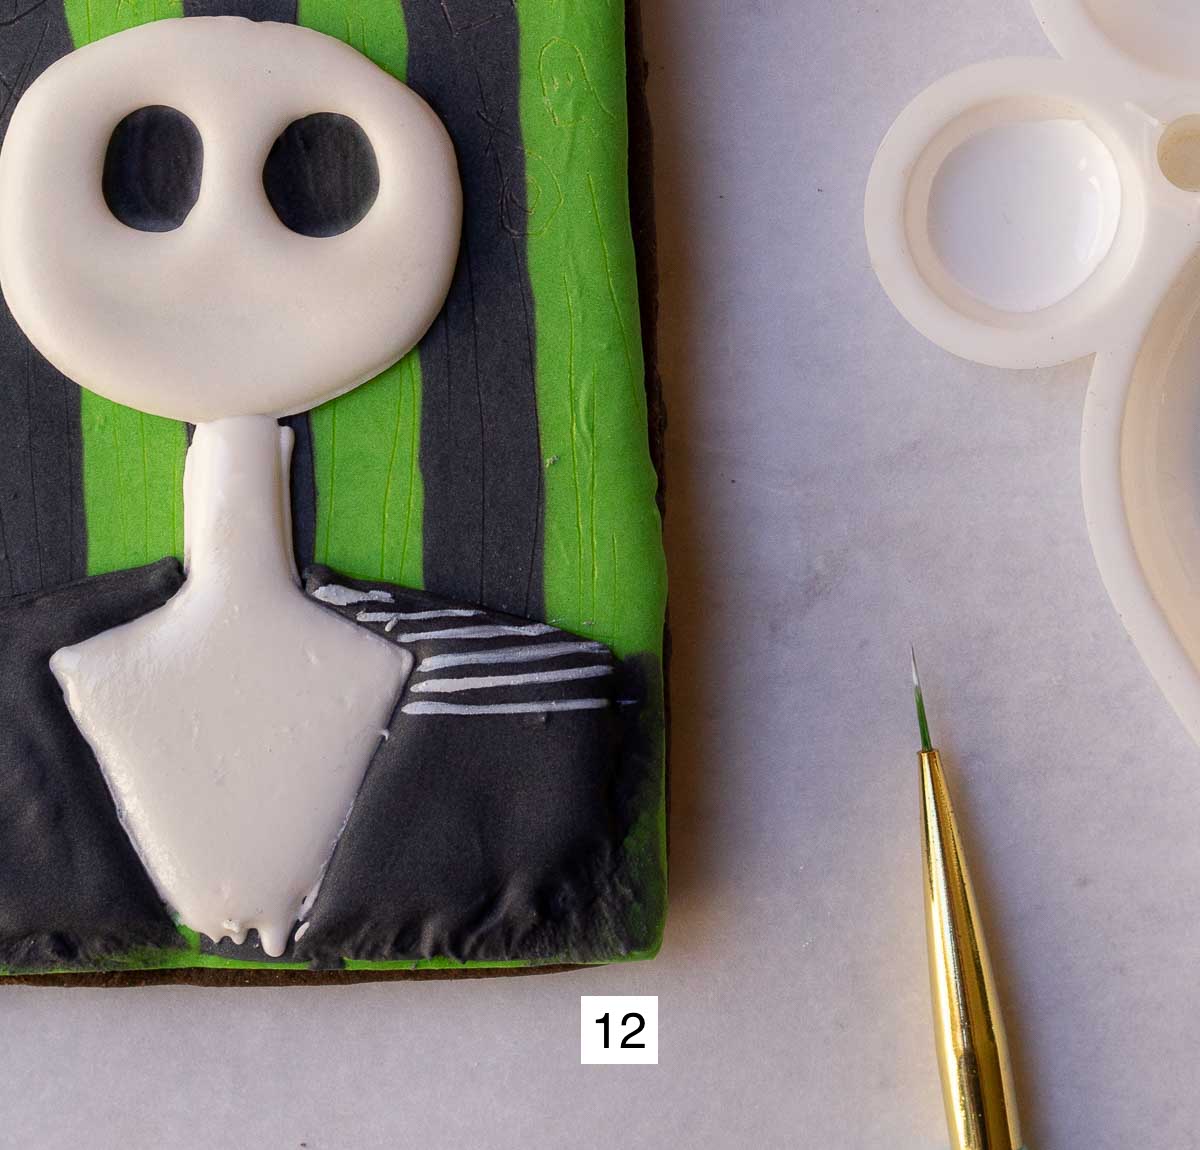
Step 12: Prepare your edible white paint in the paint palette, and thin brush for details. Dampen brush with white edible paint and gently begin creating lines on Jack's suit. (Ignore the flooded neck and shirt - again, I use multiple cookies as I work to see what will work best during the process).
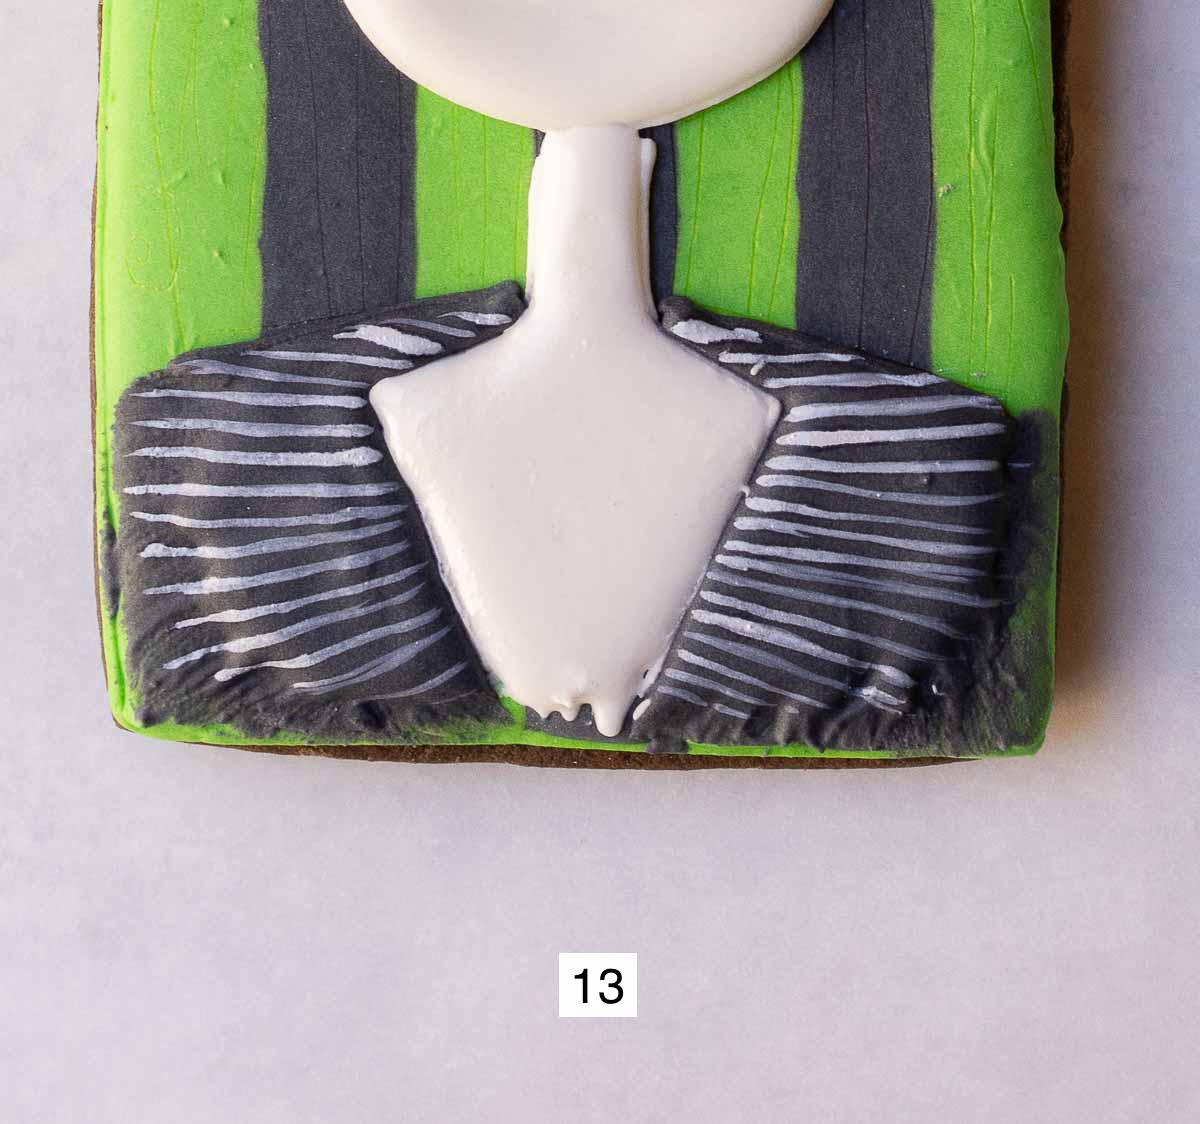
Step 13: Create the lines on both sides with the edible white paint, and then allow to dry.
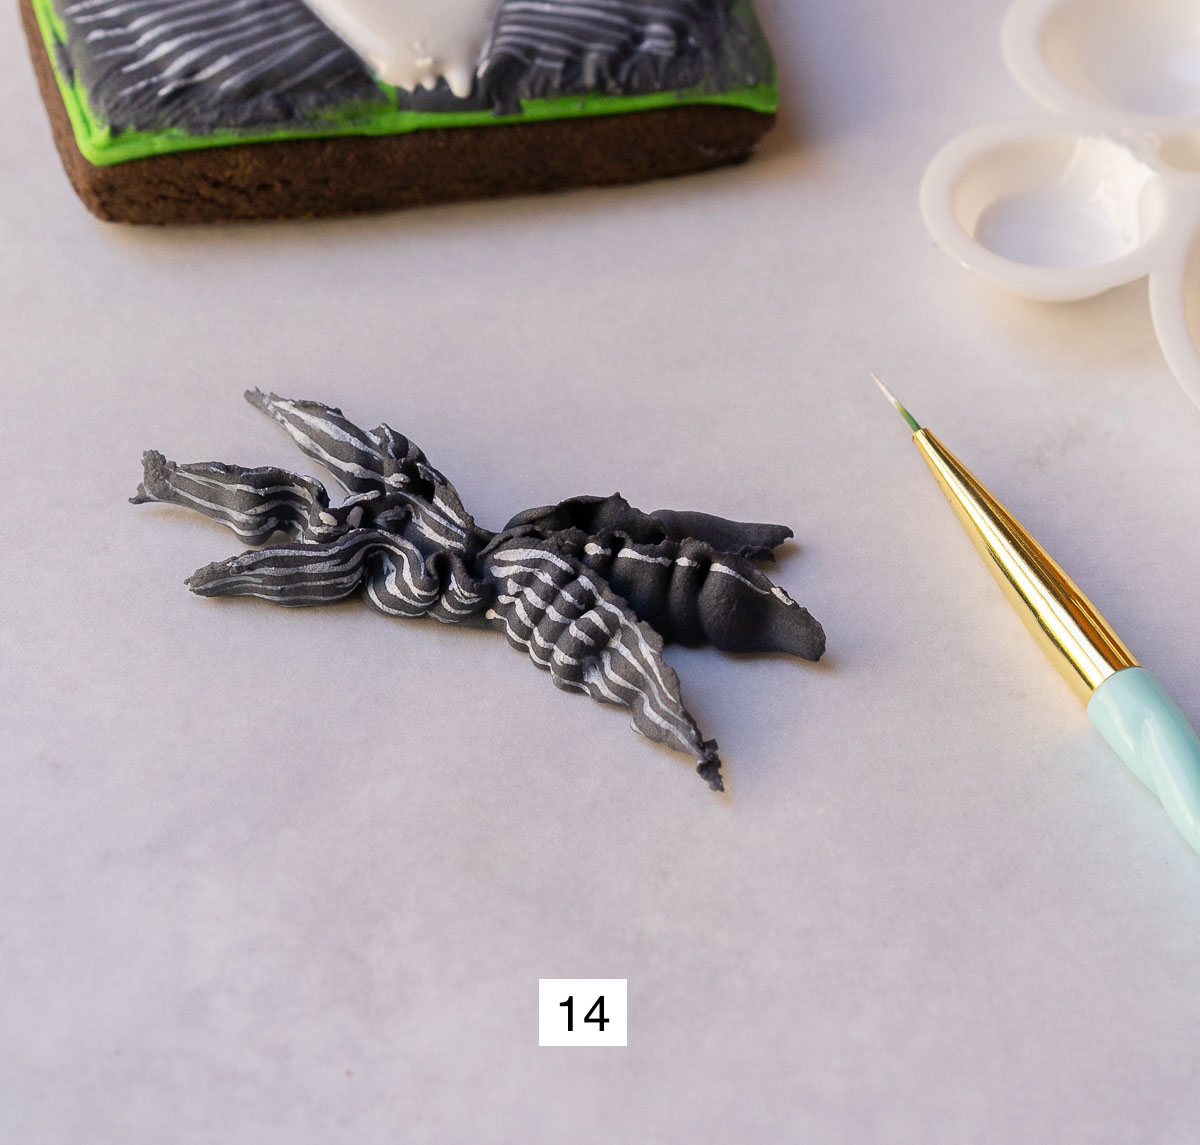
Step 14: Repeat the same white lines painting with the bow ties. Paint on both sides of the bow ties since we are going for a 3D effect.
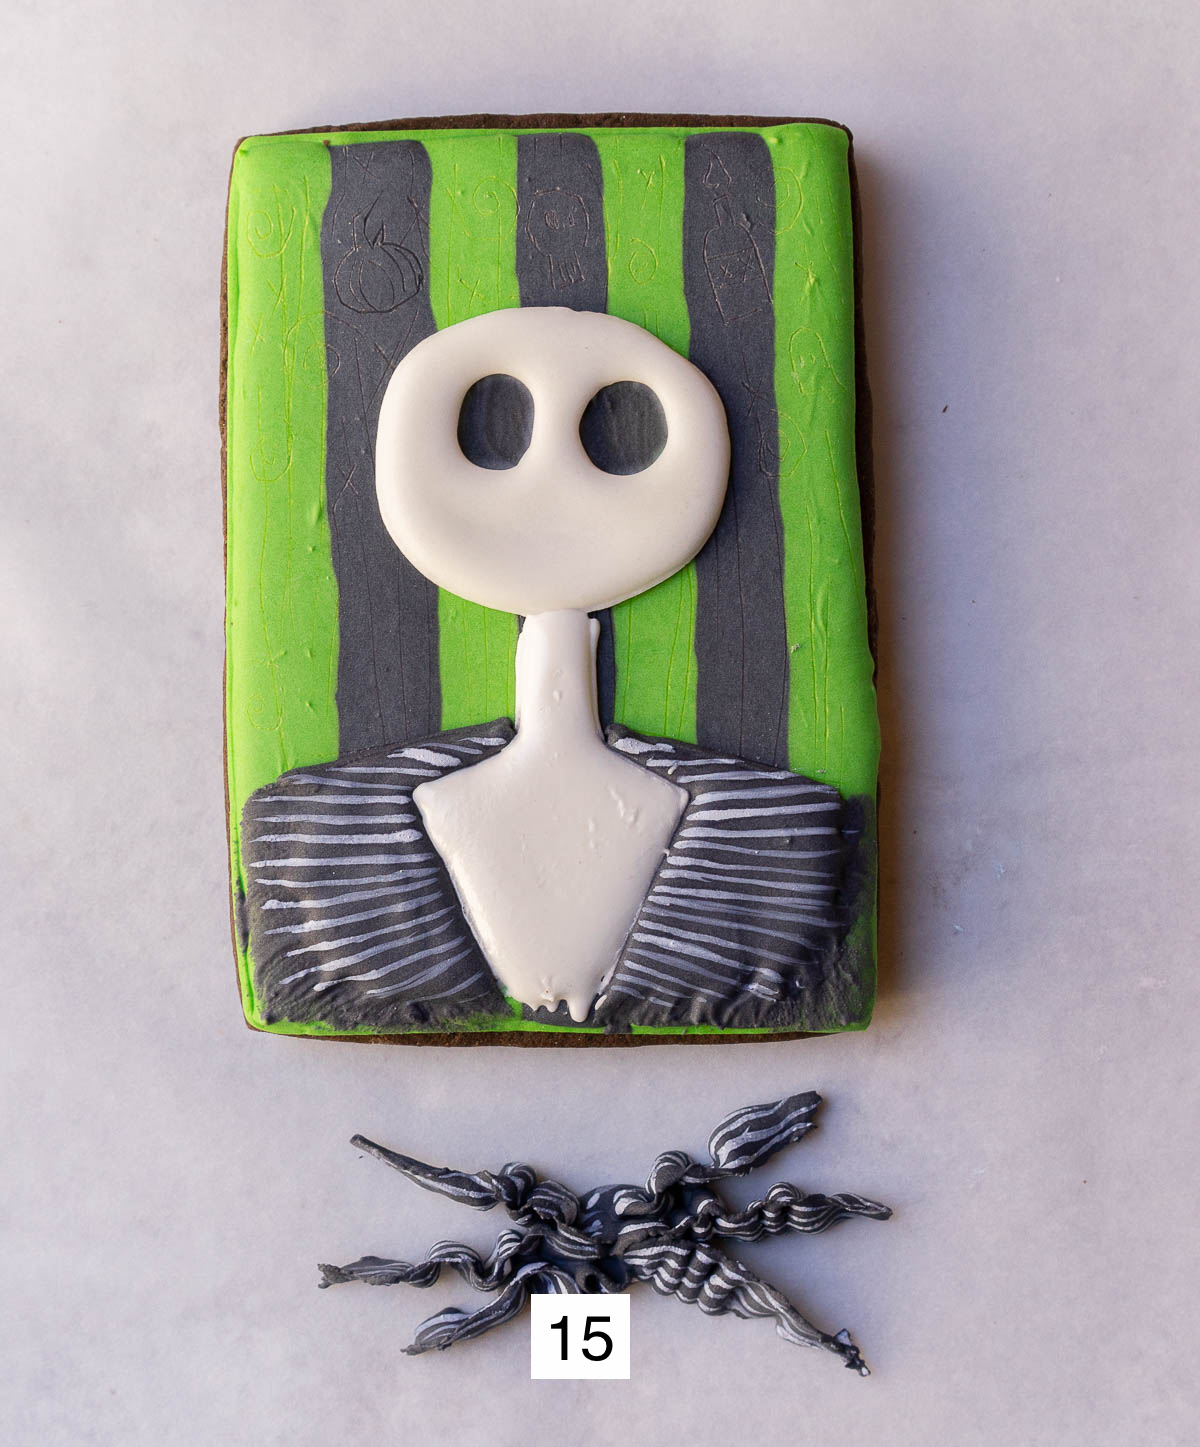
Step 15: Flood the neck and shirt area with the flood white royal icing. Have bow tie ready because we will place on top after flooding.
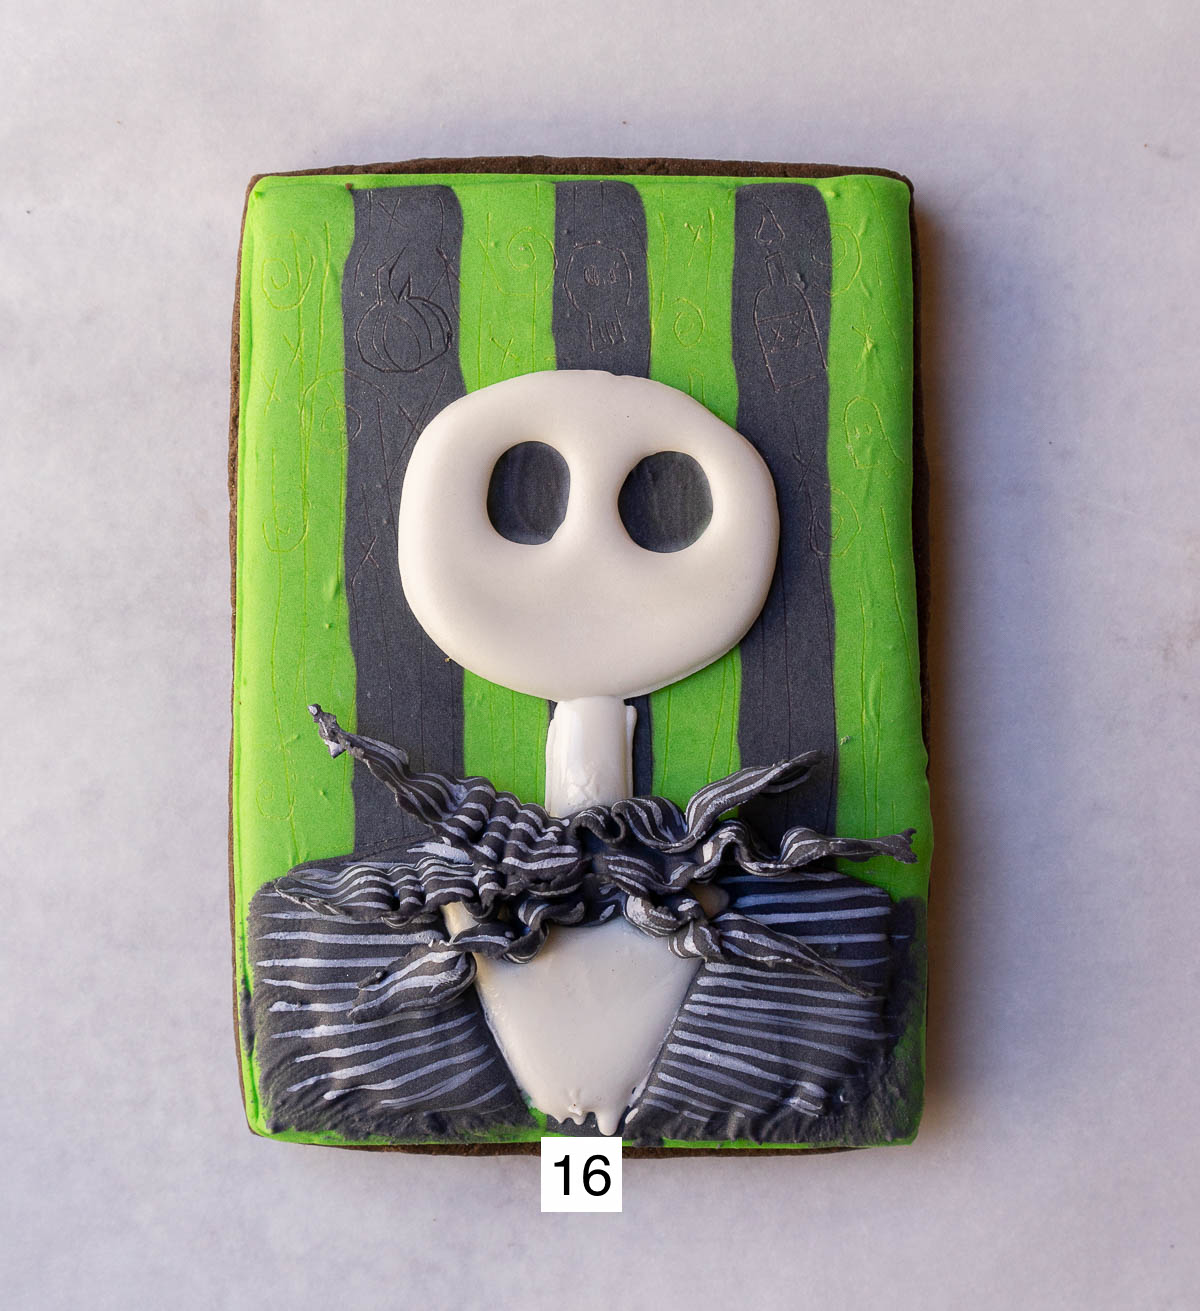
Step 16: Place bow tie in the middle and press in gently - don't press firmly because you do not want the freshly flooded royal icing to spread and go where we don't want it to go.
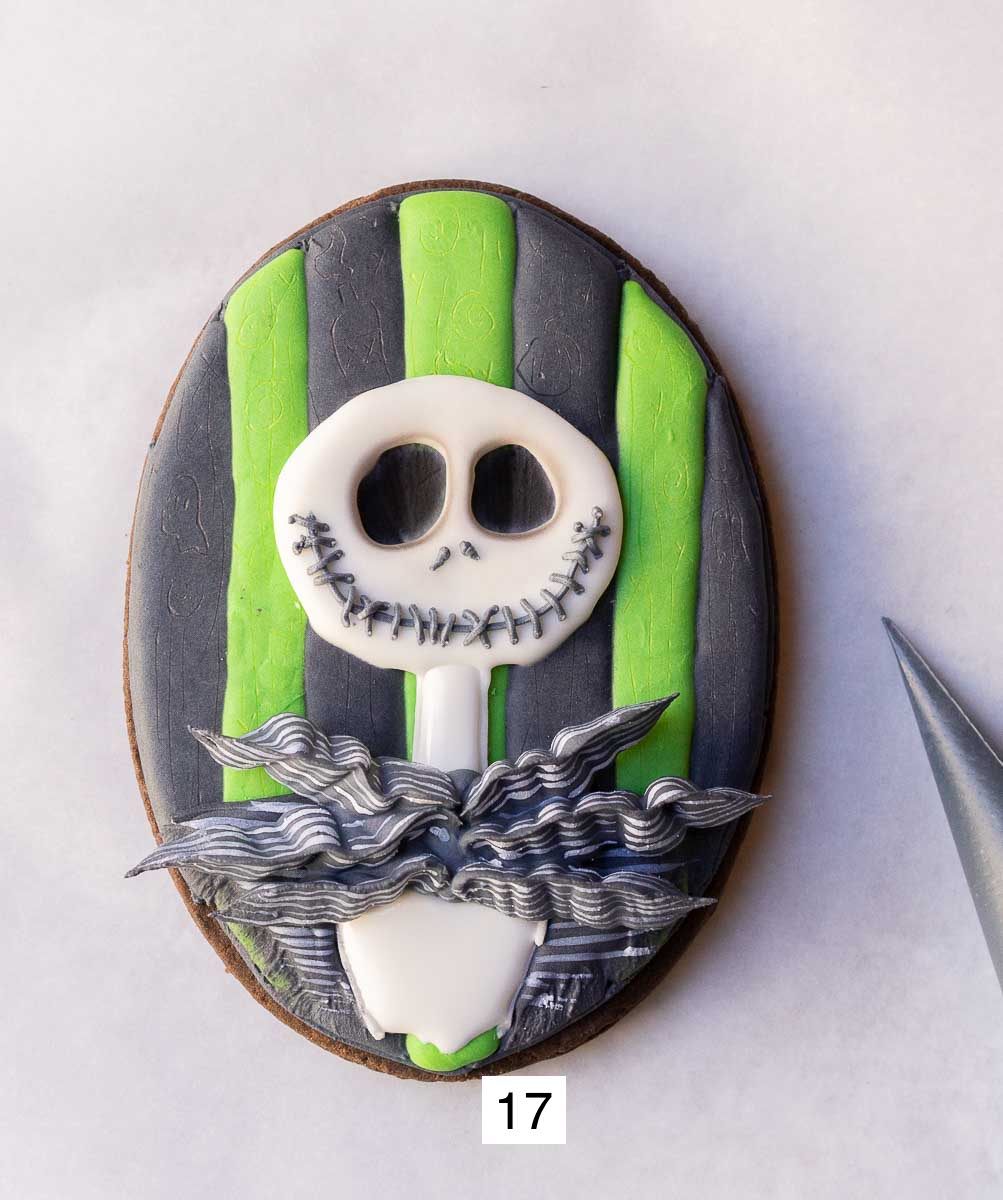
Step 17: Use the stiff black royal icing to create Jack's nose and mouth. Make sure to anchor each stitch on his mouth from one side of the cookie before pulling over to the next.
Optional: If you want to create depth in his eyes then use the black edible powder and round bristle brush to gently shade along the inside of his eyes.
Troubleshooting
Difficulty With Piping. You want to make sure with the piping tip 104 that you have that royal icing dollop to anchor the piped icing to because it makes it much easier to work with. Also, I found the Wilton's tip 104 works well, but the larger opening is a bit TOO large for the bow tie. Ateco 104 piping tip is more narrow and worked much better in my opinion. If you only have the Wilton's you can use some pliers to pinch in that larger portion to make it a bit more narrow.
More Creative Halloween Tutorials To Enjoy
If you have tried this Jack Skellington Cookie tutorial, or any other recipe on this website, please don't forget to leave a star ⭐️ review! Your feedback and comments are appreciated!
Jack Skellington Cookie
Equipment
- chocolate sugar cookie see Tools For The Job section
- Royal icing see Tools For The Job section
- large cookie cutter
- scribe or toothpick
- Wilton or Ateco piping tip 104
- disposable tipless piping bags
- fine thin brush
- flat brush
- round brush
- white edible art paint
- parchment paper
- paper towels
- paint palette
Instructions
Creating Jack's Bow Tie
- Use the stiff black royal icing with the 104 piping tip. Pipe a dollop of royal icing onto parchment paper - this is where we will anchor the bow tie.
- With the piping tip at the edge of the dollop, and the larger opening of the tip pointing down, squeeze and pull the piping tip away but also creating some wiggling movements. Stop squeezing and gently pull the bag away and you should be left with a ruffled line. Repeat 3x on one side, and then 3x on the other side.
- Place the bow ties somewhere where they can dry. Hot Tip: I like to create extra to have in case some break.
OUTLINING AND FLOODING COOKIE BASE
- Outline the cookie base with the stiff black icing. Divide the inner part of the cookie into even columns with the black icing.
- Flood each column with the flood icing, alternating between the black and neon green. Use your scribe or toothpick as needed. Allow to completely dry before proceeding to next step.
- Once the royal icing is completely dry you can etch an outline of Jack into the royal icing. You can also etch fun Nightmare Before Christmas inspired designs into the icing (optional).
- Place a bit of black flood icing where Jack's eyes will be and smooth flat using the flat bristle brush. Allow to dry.
CREATING JACK SKELLINGTON PORTRAIT
- Use the stiff white royal icing to create the outline of Jack's eyes, face, neck and shirt.
- Use flood white royal icing to fill in Jack's face only. We will flood the shirt and neck later.
- Use stiff black royal icing to outline the top of Jack's suit, and the flood with flood black royal icing but not to the edge of the cookie.
- Use the flat bristle brush to 'flatten' out the icing towards the edge of the cookie. This helps create a textured fade away. Allow to dry before proceeding to next step.
- Prepare your edible white paint in the paint palette, and thin brush for details. Dampen brush with white edible paint and gently begin creating lines on Jack's suit.
- Create the lines on both sides with the edible white paint, and then allow to dry.
- Repeat the same white lines painting with the bow ties. Paint on both sides of the bow ties since we are going for a 3D effect.
- Flood the neck and shirt area with the flood white royal icing. Have bow tie ready because we will place on top after flooding.
- Place bow tie in the middle and press in gently - don't press firmly because you do not want the freshly flooded royal icing to spread and go where we don't want it to go.
- Use the stiff black royal icing to create Jack's nose and mouth. Make sure to anchor each stitch on his mouth from one side of the cookie before pulling over to the next.
- Optional: If you want to create depth in his eyes then use the black edible powder and round bristle brush to gently shade along the inside of his eyes.


Leave a Reply